
Threaded Inserts for Resin 3D Printed Parts: Design Guide
Cured photopolymer resins are thermosets, not thermoplastics, so fastening habits carried over from FDM or injection-molded ABS often split bosses on the first assembly. This guide explains how to choose between bonded inserts, captive nut traps, tapped holes, and printed threads, and how to validate boss geometry before committing to production fixtures or functional prototypes.
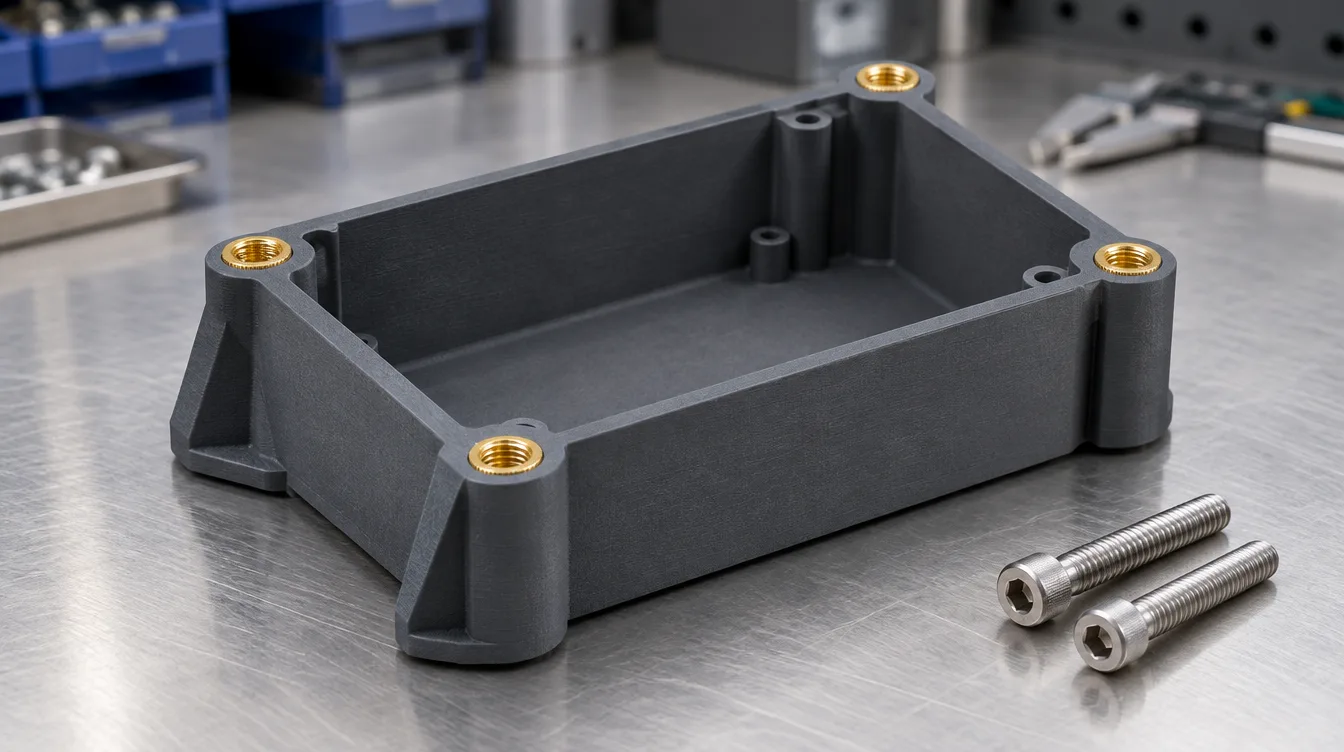
Bonded metal inserts and captive fasteners let photopolymer housings handle repeated screw torque without stressing the resin threads.
Direct Answer: To add durable metal threads to resin 3D printed parts, use adhesive-bonded knurled inserts or captive hex nut traps instead of heat-set inserts. Because cured photopolymers are cross-linked thermosets, they do not melt and reflow around a hot soldering tip; forcing a heated or oversized press-fit insert into a cured boss creates radial hoop stress that cracks the wall. Print a clearance-fit blind or through-hole, clean and fully dry the bore, bond the insert with compatible epoxy, cyanoacrylate, or liquid resin, and orient the fastener so screw tension pulls the insert into solid resin rather than out of the hole.
The guidelines below draw on general photopolymer assembly practice alongside YIDIMU industrial equipment documentation; exact hole clearances and torque limits should always be confirmed on test coupons printed in your target resin.
Key Takeaways
Skip heat-set inserts on cured photopolymer resins. They char the bore wall instead of flowing into the knurls, leaving a weak joint surrounded by micro-cracks.
Captive hex nut traps carry higher axial clamp loads than bonded inserts when your part geometry has room for a side slot or rear pocket.
Install bonded inserts from the back face of the boss whenever possible so tightening the screw pulls the insert flange against solid resin instead of relying on adhesive shear alone.
Always verify bore clearance after full washing, drying, and UV post-curing, because uncured resin trapped in blind holes shrinks the effective diameter and gums up threads.
Match the fastening method to the material: brittle standard resins crack around interference fits, while tougher engineering formulations such as ABS-like resins tolerate assembly handling better.
Fastening Terms That Prevent Miscommunication
Thermoset photopolymer: A UV-cured resin whose polymer chains form permanent cross-links during printing and post-curing. Unlike thermoplastics used in FDM or injection molding, a cured thermoset softens only slightly when heated and eventually degrades or chars rather than melting and re-solidifying around metal knurls.
Hoop stress: The outward radial tension generated around the circumference of a cylindrical boss when an oversized insert, tapered tap, or tight screw pushes the bore wall outward. Photopolymers are much weaker in tension than in compression, so excessive hoop stress appears as vertical hairline cracks running down the boss.
Pull-out vs. jack-out loading: Pull-out happens when screw tension tries to drag an insert straight out of the entry face of the boss. Jack-out happens when the mating part bridges over the insert and the screw pulls the insert toward the clearance gap. Installing an insert from the opposite side turns pull-out into compression against solid resin.
Hole clearance vs. interference fit: A clearance fit leaves a deliberate gap between the insert outer diameter and the printed bore so adhesive or liquid resin fills the space without wedging the boss open. An interference fit makes the bore smaller than the insert and relies on plastic deformation, which frequently fractures rigid resins.
Why Do Heat-Set Inserts Fail in Resin 3D Printed Parts?
Heat-set inserts fail in cured photopolymer parts because thermoset resins cannot melt and flow into the insert's undercuts. In FDM prints made from ABS, PETG, or nylon, a heated tip liquefies a thin skin of plastic that cools and locks mechanically around the knurled grooves. In LCD, DLP, or laser SLA resin, the same heat burns the bore surface, releases odor, and creates localized thermal expansion inside a rigid matrix.
Even if the insert slides in during installation—usually because the operator pushed hard enough to shave away charred resin—the surrounding boss is left pre-stressed. A common workshop failure happens a day or two later: the assembly looks intact on the bench, then splits vertically along the boss wall once the mating screw is tightened or the part goes through a thermal cycle.
Press-fit expansion inserts carry a similar risk. Knurled press-fit inserts designed for ductile sheet plastic or soft thermoplastics expand the bore as they seat. Unless you are working with a specifically formulated tough resin and a generously thickened boss, interference press-fits tend to initiate cracks at the knurl peaks during insertion.
Which Fastening Method Works Best for Resin Assemblies?
For repeated disassembly or moderate clamp loads, adhesive-bonded inserts and captive hex nut traps outperform direct printed threads and tapped resin holes. The right choice depends on how often the screw will be cycled, how much wall space the boss can spare, and whether the mating load acts in tension or shear.
| Fastening Method | Best Use Case | Cycle Durability | Crack Risk During Install | Main Design Constraint |
|---|---|---|---|---|
| Bonded knurled insert | Compact enclosures, housings, and fixtures needing clean external faces | High, provided adhesive bond and orientation resist screw torque | Low with clearance bore | Needs controlled clearance gap and clean, dry bore before bonding |
| Captive hex nut trap | Assembly jigs, brackets, and joints carrying higher clamp force | Very high; load transfers directly to nut flats and solid resin | Very low | Requires extra thickness and access slot or rear pocket |
| Tapped resin hole | Light-duty prototypes assembled once or twice | Low to moderate; threads wear quickly in brittle resins | Moderate if tap binds or chips pack | Needs tough resin, sharp flute tap, and frequent chip clearing |
| Directly printed threads | Coarse threads, caps, and low-torque covers | Low for fine machine screws | None at install | Over-curing or resin pooling in roots alters pitch fit |
When designing shop-floor fixtures or multi-part test rigs, combining methods on the same part is often practical. For example, an engineer building a fixture following a 3D printed assembly jig design guide might place captive hex nuts under toggle clamps where clamping force is highest, while using smaller bonded brass inserts to mount lightweight sensors or cover plates.
If you are only validating enclosure ergonomics or running a quick assembly fit test with resin prototypes, directly tapped holes in an engineering resin can save prep time—just do not expect those same resin threads to survive dozens of service cycles.
How Should You Design Bosses, Clearances, and Nut Traps?
Design every resin fastener boss to keep wall thickness uniform, eliminate sharp internal corners, and give excess resin and adhesive somewhere to go. Most cracking and fit issues start in CAD before the file ever reaches the slicer.
Size the boss wall and add gussets
Thin boss walls crack easily under radial load, while overly massive solid blocks cure unevenly and warp during post-curing. Keep the boss wall thick enough to support the insert without creating an isolated heavy mass, and tie tall bosses back to adjacent walls with triangular gussets and generous root fillets. Sharp 90-degree transitions where a boss meets a flat baseplate act as stress concentrators when a screw is tightened.
Add a lead-in chamfer and blind-hole relief
Include a modest entry chamfer at the mouth of the bore. It helps align the insert squarely during bonding and creates a small reservoir so displaced adhesive does not ooze onto the mating face and keep the assembly from seating flat. On blind holes, add extra depth below the bottom of the insert—both for adhesive displacement and so the screw tip never bottoms out and jacks the insert upward.
Account for blind-hole resin trapping
One detail operators learn quickly on resin printers is that small blind holes trap viscous liquid resin during the build. Even after a standard wash cycle, residual resin can stay coated along the bottom corners of a deep pocket. Once the part enters UV post-curing, that trapped resin hardens into an irregular fillet that shrinks the bore depth and prevents an insert from seating flush. Whenever the design allows, convert blind holes to through-holes or add a small side vent at the base of the pocket so solvent can flush straight through.
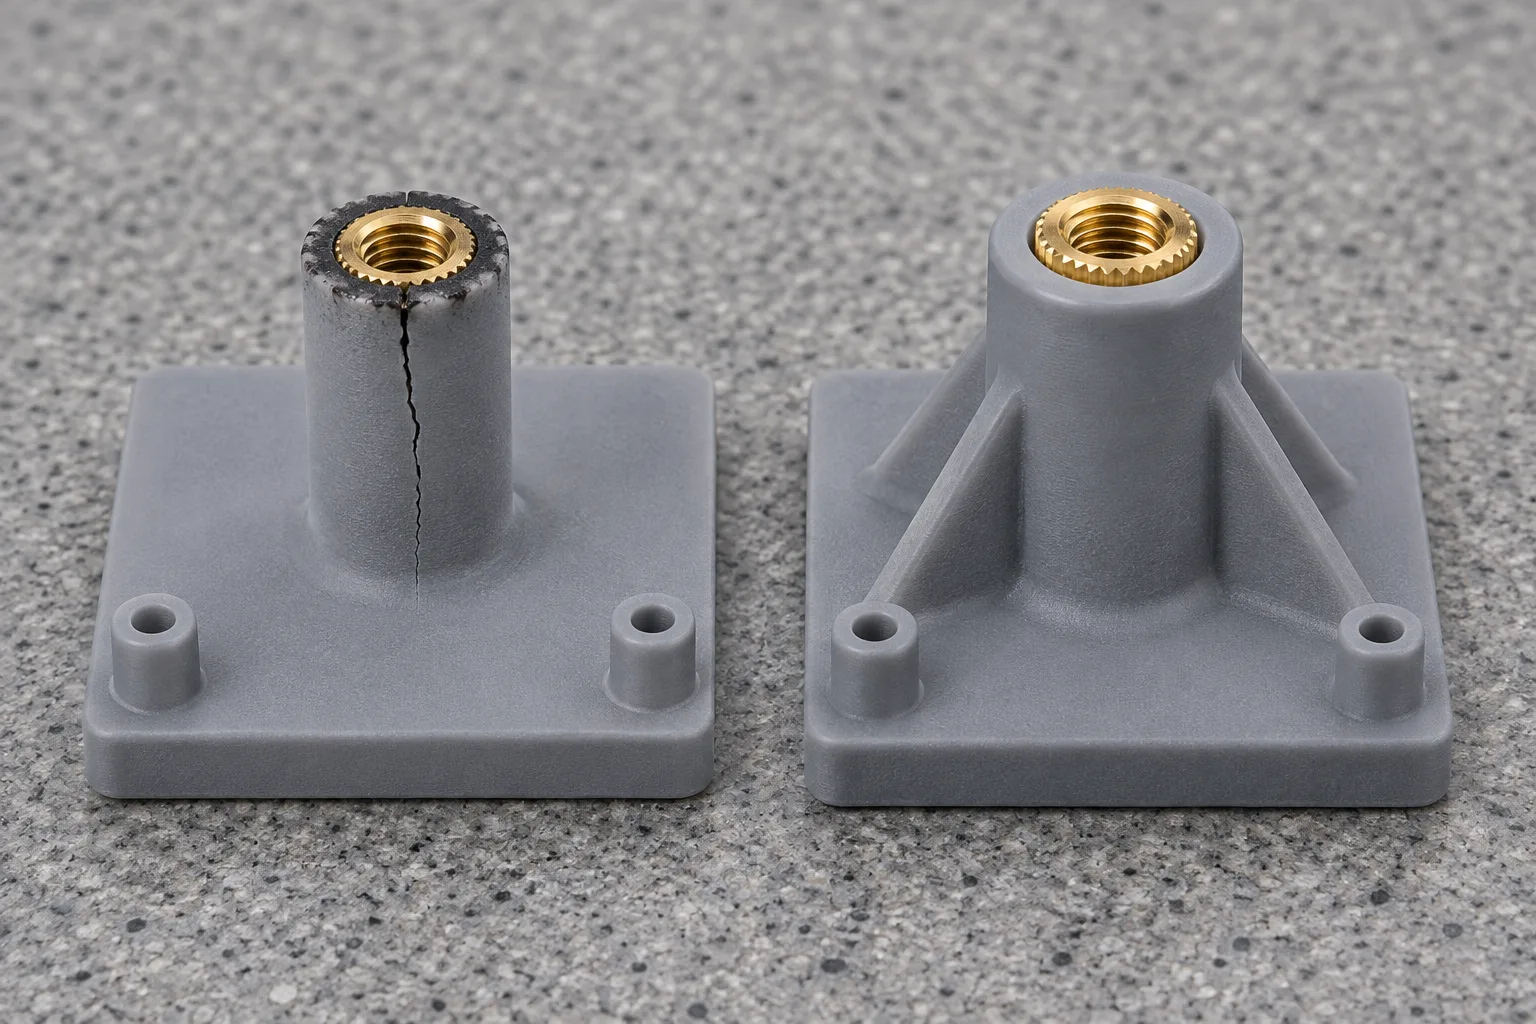
Clearance-fit bores with root fillets and entry chamfers avoid the radial hoop stress that splits bosses during heat-set or tight press-fit installation.
Orient inserts and nut traps to put resin in compression
Whenever accessibility permits, install flanged bonded inserts or captive hex nuts from the side opposite the screw head. Tightening the screw then pulls the metal flange or nut face tightly against solid resin, putting the boss into compression rather than peeling the insert out of the adhesive bond. For captive nut pockets, leave enough flat-to-flat clearance for the nut to slide in smoothly without forcing the slot open, while keeping the hex flats snug enough to stop the nut from spinning under wrench torque.
How to Bond and Cure Inserts Without Weakening the Part
Cleanliness and cure timing matter as much as hole diameter when bonding inserts into photopolymer resin. A slightly oily or half-cured bore wall causes the insert to spin freely the first time a screw binds.
Wash and flush the bore thoroughly: Use a syringe or squeeze bottle with clean solvent to flush blind holes and nut slots before final drying. Do not rely on passive soaking alone.
Dry the pocket completely: Trapped solvent softens resin surfaces and prevents cyanoacrylate or epoxy from bonding cleanly. Allow extra drying time for deep pockets before moving to UV curing.
Test-fit the insert dry after post-curing: Post-curing causes slight dimensional shrinkage in photopolymers. Check that the insert slips into the cured bore with light finger pressure—no hammering or levering.
Choose the right bonding agent: Two-part toughened epoxy handles slight clearance gaps and vibration well; medium-viscosity cyanoacrylate works fast for tight clearance fits on prototypes. Avoid relying solely on uncured liquid photopolymer resin inside deep opaque metal-lined bores, because UV light cannot penetrate behind the brass wall to cure the trapped resin.
Protect the internal threads during seating: Lightly coat a sacrificial screw with mold release or wax, thread it partway into the insert as a handle, apply adhesive to the bore wall (not the leading tip of the insert), and seat the insert flush. Back the screw out once the adhesive sets.
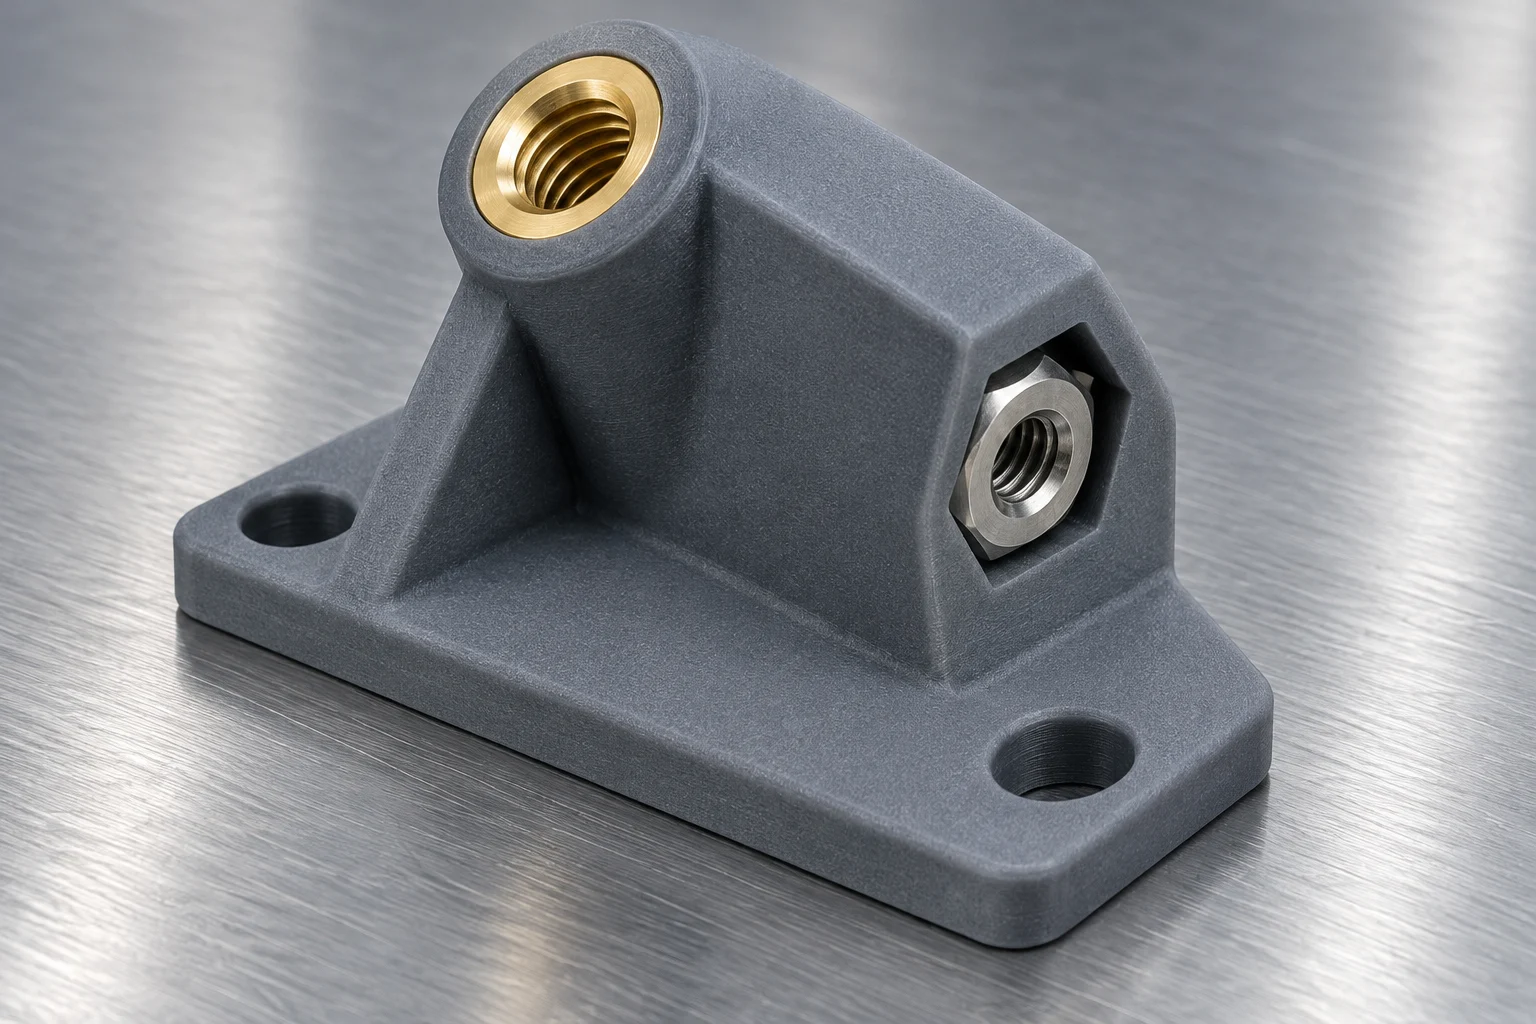
Combining rear-loaded bonded inserts with side-entry captive hex nut traps lets engineers tailor clamp strength to each joint on a single printed bracket.
Test-Coupon Qualification Template
Because cure shrinkage, resin brittleness, and hole rounding vary by material and exposure settings, print a small stepped test block with several bore diameters before printing a large enclosure or fixture. Use the blank template below to record your own test results for each resin-and-insert pair.
| Test Coupon ID | Resin & Printer Setup | Nominal CAD Bore Diameter | Measured Bore After Post-Cure | Dry Fit Feel (Loose / Slip / Tight) | Bonding Agent & Cure Time | Result After 10 Screw Cycles (Pass / Spin / Crack) |
|---|---|---|---|---|---|---|
| Coupon A | ||||||
| Coupon B | ||||||
| Coupon C | ||||||
| Coupon D |
How to Read Your Coupon Results
Look for the smallest post-cured bore that still lets the insert drop in cleanly with gentle finger pressure and zero radial forcing. If an insert spins during the 10-cycle screw test while the resin boss stays intact, the issue is usually surface contamination, incomplete solvent evaporation, or an adhesive that did not bridge the clearance gap.
If the boss cracks vertically during dry fitting or tightening, the bore is too tight, the wall is too thin, or the chosen resin is too brittle for the joint load. Do not treat a successful test in one resin as valid for another—switching from an ABS-like resin to a rigid standard or high-temperature resin changes both shrinkage and crack sensitivity, and requires re-running the coupon block.
Common Mistakes When Fastening Resin 3D Printed Parts
Using FDM heat-set insert hole tables for resin parts. Why it fails: FDM hole tables intentionally undersize the bore so melted thermoplastic can displace into the knurls; cured resin does not melt, so the boss splits. What to do instead: Switch to a clearance-fit bonded insert or captive nut pocket sized from a post-cured test coupon.
Bonding inserts with liquid UV resin inside blind metal-lined bores. Why it fails: Brass and stainless steel block UV light, leaving uncured liquid resin trapped around the knurls where it never develops shear strength. What to do instead: Use two-part epoxy or cyanoacrylate that cures chemically without needing line-of-sight UV exposure.
Sizing holes before post-curing and assuming the fit will stay the same. Why it fails: Green-state parts feel slightly softer and more forgiving, then shrink and stiffen during UV post-curing, turning a snug fit into a crack-inducing interference fit. What to do instead: Always measure and test-fit after full washing, drying, and UV post-curing.
Assuming fine XY pixel size guarantees exact hole diameters. Why it fails: Printer XY pixel size does not equal finished hole tolerance; light bleed, resin viscosity, and wash thoroughness all shift small internal diameters inward. What to do instead: Compensate small bores empirically based on measured test coupons rather than nominal CAD dimensions.
Limitations and Validation
Adhesive-bonded inserts and captive nuts extend the mechanical life of photopolymer parts, but they do not turn cured resin into machined aluminum or glass-filled nylon. The guidelines in this article do not hold for joints exposed to continuous high torque, heavy impact shock, or sustained temperatures near the resin's heat deflection limit, where creep gradually relaxes screw preload regardless of insert quality.
Before releasing a fastened assembly to a production line or functional test rig, run a simple validation loop: print at least three test coupons at different locations across the build platform (center and edges), measure bores before and after UV post-curing, bond the inserts, and cycle the mating screw to your target assembly torque across the expected service count. Inspect the boss under angled light for hairline cracks after 24 hours under load. For assemblies that also rely on elastic latches, pairing this check with snap-fit validation for resin prototypes gives a fuller picture of joint durability.
Relevant YIDIMU Systems and Materials
Fastened enclosures, housings, and production fixtures benefit from stable dimensional output across the build platform and resins formulated for assembly handling rather than display-only models:
ABS-Like Resin for Industrial Models and Prototypes: Suited for enclosures, brackets, and assembly prototypes where tougher handling characteristics reduce the risk of chipping or boss cracking around fasteners compared with brittle standard resins.
Eternal M1 Industrial Resin 3D Printer: An industrial LCD masked-exposure (MSLA) system fitted to mid-sized functional resin prototypes, multi-piece enclosures, and repeatable test-coupon validation.
Eternal M2 Large-Format Industrial Resin 3D Printer: A large-format industrial LCD (MSLA) system suited to printing full-size assembly jigs, checking fixtures, and large housings in one piece, reducing the number of split joints and secondary fasteners required.
Pre-Print Fastener Design Checklist
Replace heat-set inserts with clearance-fit bonded inserts or captive hex nut pockets.
Orient flanged inserts and captive nuts on the back side of the boss so screw tension compresses solid resin.
Convert deep blind holes to through-holes or add flush/drain vents where geometry allows.
Add entry chamfers for insert alignment and adhesive relief, plus root fillets and gussets at the boss base.
Leave extra blind-hole depth below the insert so the screw tip cannot bottom out and jack the insert free.
Print and post-cure a stepped bore coupon in the exact target resin before locking in final CAD hole sizes.
Use chemically curing epoxy or cyanoacrylate—not UV resin—inside opaque metal-lined bores.
Frequently Asked Questions
Can you use heat-set inserts in resin 3D printed parts?
No, standard heat-set inserts are not recommended for cured photopolymer resin. Because resin prints are cross-linked thermosets rather than thermoplastics, they do not melt and flow into the insert knurls. Heating the bore chars the resin and introduces radial stress that often cracks the boss during or after assembly.
What is the best glue for threaded inserts in resin 3D prints?
Two-part toughened epoxy is the most reliable choice for functional parts and fixtures because it fills slight clearance gaps and resists vibration. Medium-viscosity cyanoacrylate works well for tight slip-fit prototype holes when quick cure times matter. Avoid UV-curable liquid resin inside metal-lined blind holes where UV light cannot reach.
Should you install threaded inserts before or after UV post-curing?
Install bonded inserts after full washing, drying, and UV post-curing. Curing causes slight shrinkage and increases stiffness; if you bond a metal insert into a soft green-state part first, subsequent post-cure shrinkage around the rigid metal sleeve can create internal stress and split the boss wall.
Are directly printed threads usable in resin 3D printing?
Directly printed threads work for coarse thread pitches, low-torque caps, and light prototypes that are rarely disassembled. For small machine screws or parts cycled repeatedly on a test bench or assembly line, cured resin threads wear down quickly and should be replaced with bonded metal inserts or captive hex nuts.
When is a captive hex nut better than a bonded brass insert?
Choose a captive hex nut whenever the joint carries high clamping force, experiences vibration, or undergoes frequent screw removal and your part has room for a side slot or rear pocket. A captive nut transfers axial load directly into solid resin without depending on adhesive bond strength.
Need to Validate Fastened Resin Parts Before Tooling or Fixture Rollout?
Send your CAD assembly, target fastener sizes, expected service cycles, and resin requirements to the YIDIMU applications team. We can review boss geometry for photopolymer manufacturability and arrange sample test builds so you can verify fit and torque durability on real hardware before committing to equipment. Submit a Part for Evaluation.