
3D Printer Build Volume Comparison: How to Choose the Right Size
A useful 3D printer build volume comparison should look beyond the advertised X × Y × Z dimensions.
For resin 3D printing, the real questions are:
Will the supported part fit at the required orientation?
How many parts can fit on one build platform?
Is there enough vertical height after supports are added?
Can the washing and UV curing workflow handle the resulting parts?
Does the larger platform actually improve production capacity?
A printer with a larger nominal build volume is not automatically the better choice. The correct size depends on the parts you need to print and how those parts are arranged during production.
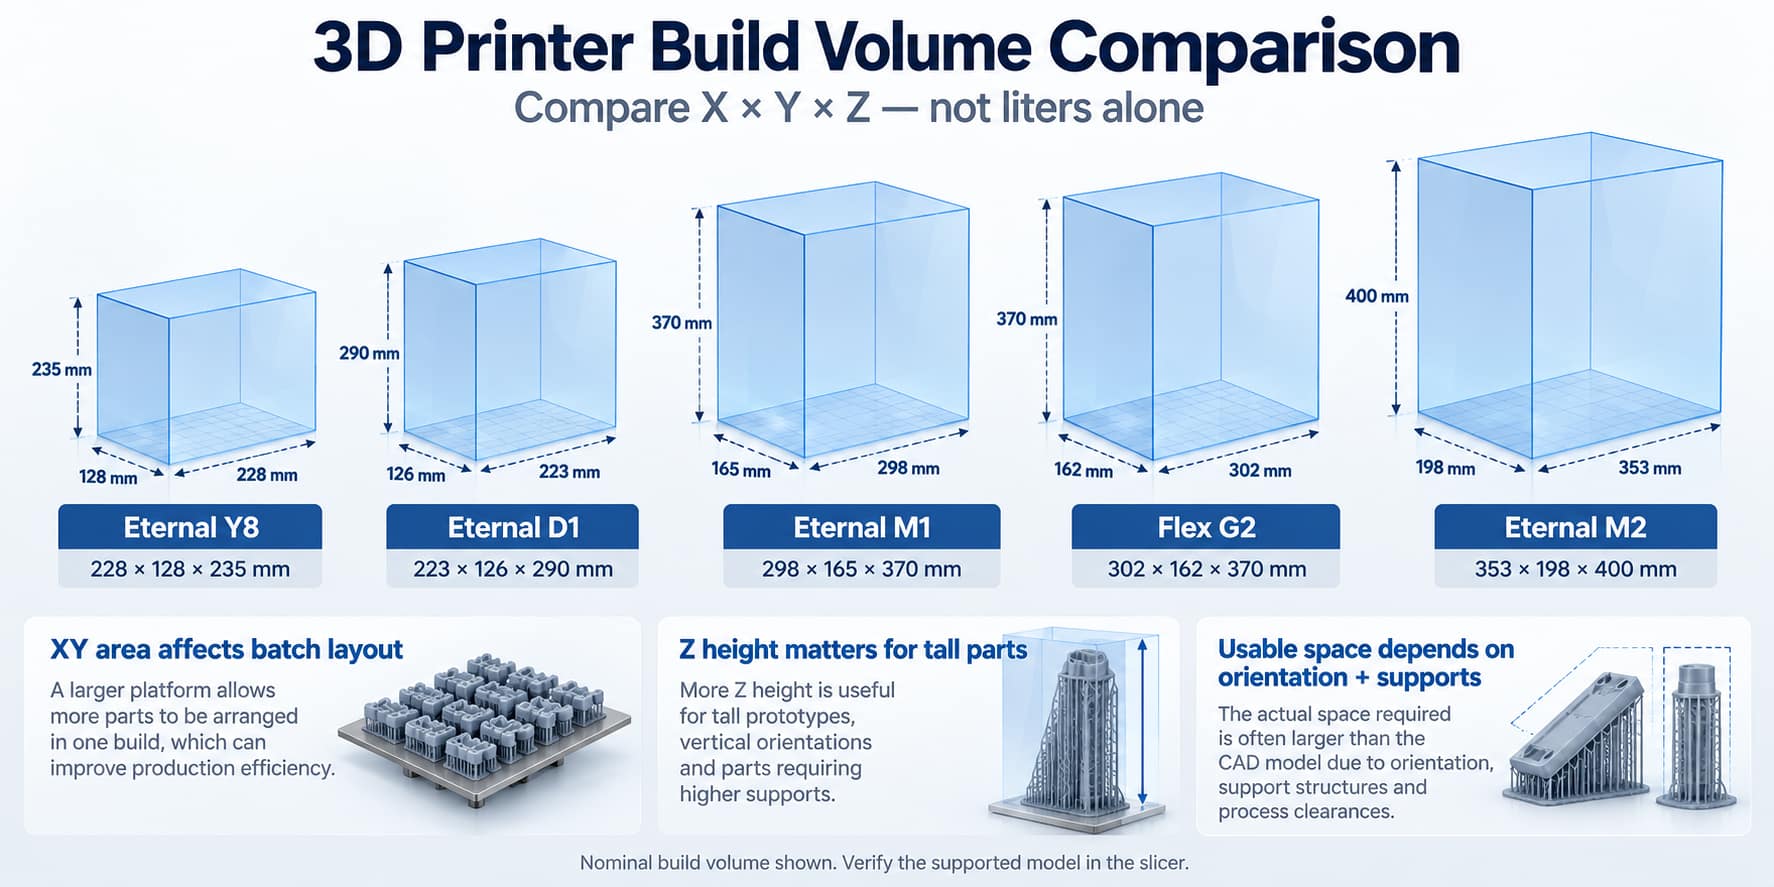
What Is 3D Printer Build Volume?
Build volume is the maximum nominal three-dimensional printing envelope provided by the printer manufacturer.
It is normally written as:
X × Y × Z
For example:
353 × 198 × 400 mm
The X and Y dimensions describe the available build-platform area, while Z represents the maximum vertical printing height.
This specification is useful for initial screening, but it does not mean that any model smaller than those three dimensions can automatically be printed successfully.
Orientation, support structures, platform clearance and process requirements all reduce the practically usable space.
Build Volume Comparison: YIDIMU Resin 3D Printers
The following comparison shows several current YIDIMU printer configurations.
| Printer | Nominal Build Volume | Approx. Geometric Envelope* | Typical Workflow |
|---|---|---|---|
| Eternal Y8 | 228 × 128 × 235 mm | 6.86 L | Dental models and precision resin parts |
| Eternal D1 | 223 × 126 × 290 mm | 8.15 L | Dental and fine-detail professional workflows |
| Eternal M1 | 298 × 165 × 370 mm | 18.19 L | Industrial prototypes and professional models |
| Flex G2 | 302 × 162 × 370 mm | 18.10 L | Flexible parts, lattices and elastomer samples |
| Eternal M2 | 353 × 198 × 400 mm | 27.96 L | Larger industrial prototypes and multi-part builds |
*The geometric envelope is calculated from X × Y × Z and is included only to show relative scale. It is not resin-tank capacity, material consumption or guaranteed usable printing volume.
This distinction is important.
For example, Eternal D1 has a slightly smaller XY platform than Eternal Y8, but its greater Z height produces a larger theoretical three-dimensional envelope. That does not automatically mean D1 can fit more dental models in one layer of a batch. For that comparison, usable XY platform area is often more important.
Do Not Compare Build Volume by Liters Alone
Multiplying the three build dimensions gives a convenient numerical comparison:
Geometric envelope in liters = X × Y × Z ÷ 1,000,000
However, this number can hide major differences between printers.
Consider two hypothetical machines:
Printer A has a wide platform but moderate Z height.
Printer B has a smaller platform but much greater Z height.
Printer B could have a larger total cubic volume while still fitting fewer parts side by side.
For batch resin printing, XY area and model layout can matter more than total cubic volume.
For tall prototypes, Z height may become the limiting dimension.
The specification that matters depends on the geometry of the actual job.
Nominal Build Volume vs Usable Build Volume
The advertised printer dimensions describe the machine envelope.
The usable build volume is the space that remains practical after the model has been prepared for printing.
Several factors can change it.
Model Orientation
Resin parts are frequently rotated rather than printed in their original CAD orientation.
Orientation may be changed to:
improve support placement;
protect important surfaces;
reduce problematic cross-sectional areas;
improve drainage;
reduce trapped resin;
control deformation;
improve print stability.
Once the model is rotated, its effective X, Y and Z dimensions can become significantly larger than its original CAD dimensions.
A 250 mm-long component therefore does not necessarily require only 250 mm of build width.
Supports Require Additional Space
Support structures extend beyond the finished geometry.
They may increase:
footprint;
overall height;
spacing requirements;
clearance between neighboring parts.
Comparing only the unsupported CAD bounding box can therefore result in selecting a printer that appears large enough on paper but cannot accommodate the actual supported build.
Platform Margins Matter
Using every theoretical millimeter of the printing envelope is rarely a useful procurement assumption.
The required margin depends on the machine, geometry, orientation and printing process.
Instead of assuming a universal safety margin, place the actual supported part in the intended slicer and verify the complete layout.
Compare XY Area Separately From Z Height
A better build volume comparison separates the horizontal platform from vertical capacity.
XY Build Area
XY dimensions affect:
how many parts fit in one batch;
whether wide parts require splitting;
how efficiently multiple models can be nested;
whether several design variants can be printed together.
For repeated small-batch production, this is often one of the most important capacity variables.
Z Build Height
Z capacity becomes more important for:
tall engineering prototypes;
vertically oriented parts;
long structural models;
parts requiring substantial support height;
geometries that cannot be positioned flat.
More Z height is useful only when the application actually needs it.
A factory printing dozens of relatively flat components may gain more from additional XY area than from additional vertical travel.
A Better Build Volume Comparison Method
Instead of comparing specifications first, compare your actual files.
1. Select a Representative Part
Use a part that reflects the real workload rather than a specially optimized demonstration model.
For production evaluation, also include the largest expected part.
2. Orient the Part for the Real Printing Process
Use the orientation that would realistically be used for:
surface-quality requirements;
support access;
drainage;
dimensional requirements;
printing stability.
Do not rotate the model simply to make it fit the smaller printer if that orientation would not be acceptable in production.
3. Generate Realistic Supports
Generate the support structure before measuring the required printing envelope.
The comparison should use:
supported model dimensions, not only CAD dimensions.
4. Create a Batch Layout
For each candidate printer, place as many realistically supported parts as practical using the same preparation rules.
Record:
Parts per validated build
This is usually a more useful production metric than total build volume in liters.
5. Check the Full Z Height
Verify the height from the lowest support or base structure to the highest point of the finished build.
A model that appears to fit from its CAD dimensions may exceed the available Z travel after orientation.
6. Check Post-Processing Capacity
A larger build platform can produce more parts per cycle, but those parts still require:
printing → removal → washing → drying → support removal → UV curing → finishing → inspection
If washing or curing equipment cannot process the larger batch efficiently, increasing printer build capacity may simply move the bottleneck downstream.
Build Volume and Batch Production
For small-batch manufacturing, the most useful question is usually not:
Which printer has the largest build volume?
It is:
How many acceptable parts can we produce from one complete build?
Suppose two printers differ significantly in nominal volume.
If your component is relatively short, additional Z height may provide no increase in batch capacity.
A wider platform, however, might allow another row of components to fit.
That can directly reduce the number of builds required.
For this reason, procurement teams should compare actual nesting layouts whenever throughput matters.
When a Larger Resin 3D Printer Makes Sense
A larger build volume can be useful when the application involves:
large industrial prototypes;
product housings;
engineering models;
long or tall components;
multiple prototypes in one job;
repeated small-batch production;
several design variants printed together;
reducing unnecessary model splitting.
YIDIMU Eternal M2, for example, provides a 353 × 198 × 400 mm nominal build envelope for industrial prototype and multi-part workflows.
For flexible-material development, Flex G2 provides a 302 × 162 × 370 mm build volume and is designed around flexible and elastomer resin applications such as soft components and lattice structures.
The application and material system should therefore be evaluated together with machine size.
When a Smaller Build Volume May Be More Practical
Buying the largest available machine is not always efficient.
A smaller printer may be more appropriate when:
parts are consistently small;
daily batch quantities are limited;
workspace is restricted;
the workflow frequently changes materials;
post-processing capacity is modest;
high platform utilization is more important than maximum part size.
For dental laboratories, for example, the number of models required per build may be more relevant than the ability to print a very tall industrial component.
The machine should match the normal workload while still leaving reasonable capacity for larger or peak-demand jobs.
Should You Split a Large Model or Use a Larger Printer?
Both approaches are possible, but splitting a model introduces additional engineering considerations.
A divided part may require:
alignment features;
bonding;
sanding;
seam finishing;
dimensional inspection;
additional assembly labor.
Splitting may be acceptable for an appearance model.
It may be less suitable when the prototype is intended to evaluate:
assembly fit;
continuous surfaces;
dimensional relationships;
structural geometry;
sealing surfaces.
Before choosing a smaller printer on the assumption that large parts can always be divided, evaluate whether the joint changes what the prototype is supposed to prove.
Build Volume Does Not Determine Print Accuracy
Build volume and accuracy are separate printer characteristics.
A larger machine is not automatically less accurate, and a smaller printer is not automatically more accurate.
Likewise:
screen resolution is not finished-part accuracy;
pixel size is not dimensional tolerance;
layer thickness is not Z-axis accuracy;
nominal build volume is not usable production capacity.
Finished-part results depend on the complete system, including the printer, resin, exposure parameters, orientation, supports, washing, UV curing and inspection method.
Build volume should therefore be treated as one equipment-selection variable rather than a general measure of printer performance.
Practical Build Volume Selection Checklist
Before choosing a resin 3D printer, prepare these five pieces of information:
| Requirement | What to Record |
|---|---|
| Largest part | Supported X × Y × Z dimensions |
| Typical part | Actual production geometry |
| Batch quantity | Required parts per build |
| Material | Resin type and process requirements |
| Post-processing | Washing and curing capacity |
Then perform the same slicing and nesting exercise for every candidate printer.
This creates a much more meaningful build volume comparison than placing specification sheets side by side.
Choosing the Right YIDIMU Build Size
For compact dental and precision-model workflows, Eternal Y8 and Eternal D1 provide comparatively compact build platforms.
For larger professional prototypes and model-making work, Eternal M1 increases both platform area and vertical capacity.
Flex G2 provides a larger build envelope specifically for flexible-material and elastomer applications.
For industrial teams requiring larger rigid prototypes or greater multi-part layout capacity, Eternal M2 provides the largest build envelope among the models compared above.
The final selection should still be confirmed using the actual model.
If you are evaluating a specific part, send YIDIMU the 3D file, model dimensions, material requirement, expected quantity and important surfaces or dimensions. A representative sample layout or sample print can help determine whether the selected build volume is appropriate before equipment selection.
FAQ
What does build volume mean on a 3D printer?
Build volume is the nominal X × Y × Z space available for printing. The practically usable space may be smaller after model orientation, supports and process clearances are considered.
Is a larger build volume always better?
No. A larger build volume is useful when it increases usable part size or batch capacity. If most parts are small, additional machine capacity may provide little practical benefit while increasing equipment and workflow requirements.
Should I compare 3D printer build volume in liters?
Liters can show the relative size of rectangular printing envelopes, but they can be misleading. Compare XY platform area, Z height and realistic supported-part layouts separately.
How do I know whether my model will fit?
Import the actual model into the intended slicing workflow, orient it correctly, generate realistic supports and confirm its complete supported dimensions against the printer's build envelope.
Which dimension matters most for batch printing?
For many repeated resin-printing jobs, XY platform area has a strong effect on how many parts can fit per build. Z height becomes more important for tall parts or orientations requiring additional vertical space.
Can a part larger than the printer build volume be printed?
It may be possible to divide the model and assemble it after printing. Whether this is suitable depends on the purpose of the part, acceptable seams, dimensional requirements and assembly process.
References
Model Orientation Best Practices for SLA Printing
Moving and Rotating a Model in PreForm
Form 4L Technical Specifications and Build Volume Comparison