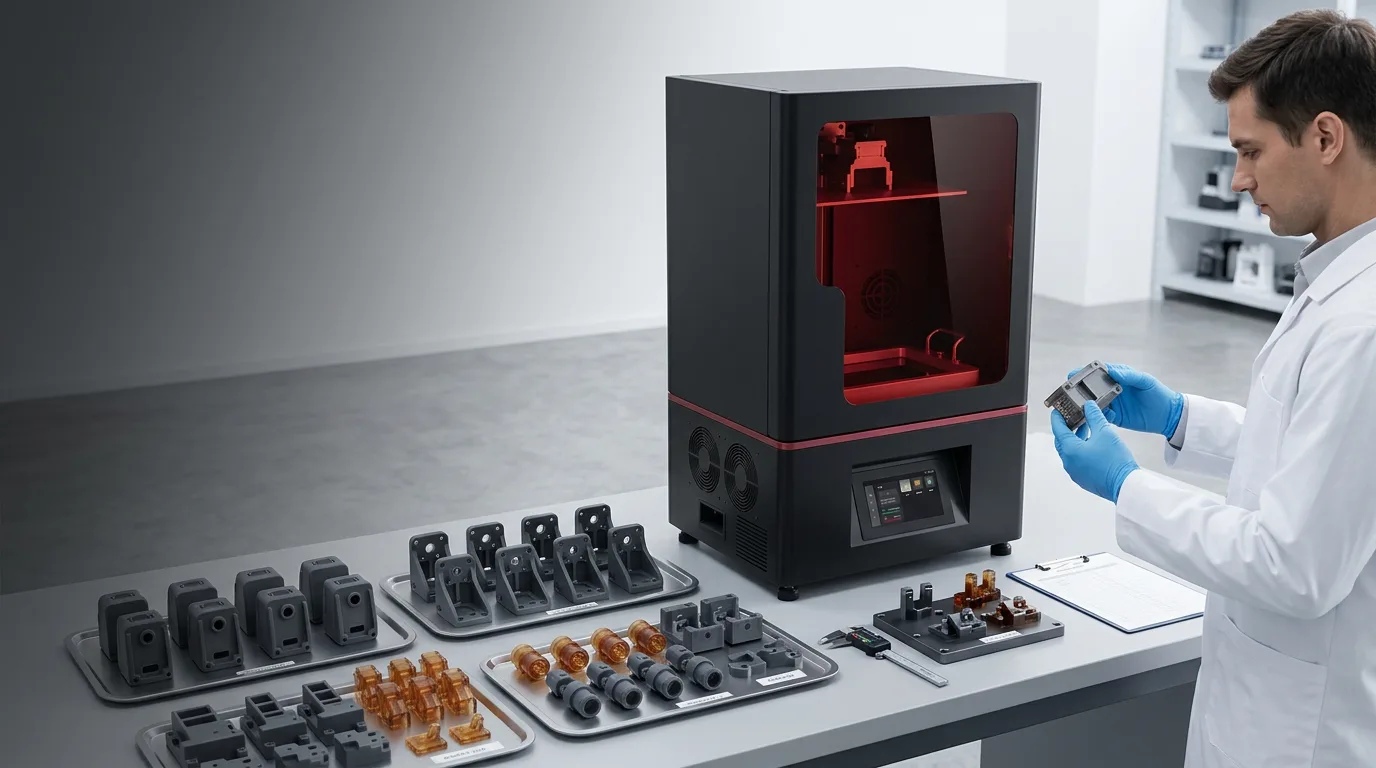
Industrial resin 3D printer producing a coordinated batch of engineering parts

Production Strategy · Resin Additive Manufacturing

Resin 3D Printing for Low-Volume Manufacturing

A practical framework for deciding when resin printing can replace, delay or complement tooling—and how to control the full workflow from file preparation to accepted parts.

Resin 3D printing for low-volume manufacturing is most effective when a project needs limited quantities, detailed surfaces, complex geometry, frequent design changes or customization without committing immediately to production tooling.

It is not automatically the lowest-cost process for every batch. The correct decision depends on accepted-part cost, required material behavior, part size, inspection criteria, labor, washing, complete drying, UV post-curing and the expected number of repeat builds. A representative pilot batch should be qualified before a resin workflow is treated as production-ready.

Strong use cases

  • Product housings, detailed components and specialized production aids
  • Bridge production while tooling is being prepared or revised
  • Customized parts or multiple variants with shared process requirements
  • Market-test quantities and controlled pilot production
  • Geometry that would make conventional tooling slow or expensive to change

Conditions that require caution

  • Unverified mechanical, thermal, chemical or environmental requirements
  • Large parts that exceed the practical build and post-processing capacity
  • High volumes where a stable tooling process has a lower accepted-part cost
  • Parts with inaccessible cavities that cannot be washed and dried consistently
  • Projects lacking written tolerances, inspection methods and pass-fail criteria

Decision Framework

What “low volume” means in a resin production decision

Low volume is not a universal unit count. For one part, it may mean a few dozen units; for another, several hundred builds may still be low volume. The useful definition is economic and operational: the quantity is below the point where the fixed cost, lead time and design lock-in of conventional tooling clearly outperform a qualified additive workflow.

Resin printing shifts the cost structure. Tooling cost is reduced or deferred, but each accepted part still carries material, machine, support, labor, washing, drying, curing, inspection and failure costs. This makes the process attractive when flexibility has real value—especially during product launch, frequent revision, customization or uncertain demand.

Use accepted-part cost, not printer time alone. A useful calculation includes resin consumed in parts and supports, failed builds, operator labor, washing media, drying and curing, maintenance, inspection, packaging and expected equipment downtime. Divide the total by the number of parts that actually pass inspection.

The break-even point should be recalculated when geometry, quantity, resin, orientation or acceptance criteria change. A batch of compact parts nested efficiently on a platform can behave very differently from a single tall part with heavy supports and long post-processing.

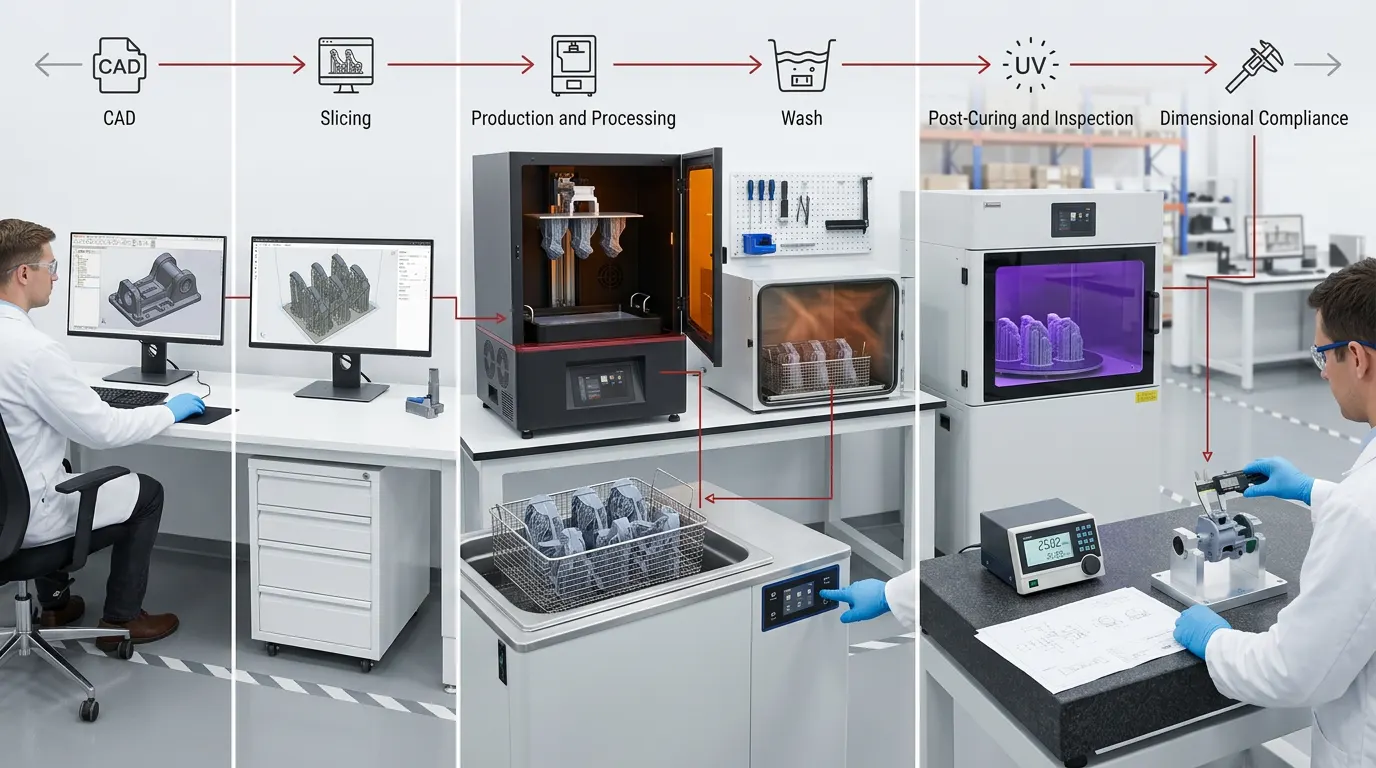
Controlled Workflow

From production file to accepted batch

Define the production requirement

Document quantity, part dimensions, critical features, mating surfaces, cosmetic areas, material behavior, operating environment and inspection method. Separate essential criteria from preferences.

Prepare a representative model

Check scale, units, wall thickness, mesh integrity, cavities and drainage. Include the difficult features that will determine whether the real production part can be supported, washed and inspected.

Select printer, resin and orientation together

Printer architecture, resin formulation, geometry, orientation, support strategy and exposure settings interact. Avoid choosing any one of these in isolation.

Run a pilot build

Use the planned nesting density and workflow rather than printing one ideal demonstration part. Record resin batch, software profile, environmental conditions, placement and post-processing steps.

Wash, dry and post-cure consistently

Uncured resin removal, complete drying and UV post-curing are manufacturing steps, not cosmetic finishing. Follow the current documentation for the exact resin and application.

Inspect and release the batch

Measure agreed features, review support-contact surfaces and check functional fit. Use written acceptance criteria so the next batch can be compared with the same method.

Controlled resin 3D printing workflow from file preparation through inspection
A production workflow should connect the digital file, build preparation, printing, post-processing and inspection as one controlled process.

Process Comparison

When resin printing is likely to compete with tooling

Decision factor Resin 3D printing Conventional tooling process What to verify
Upfront commitment Usually lower because the digital file drives production. Can require substantial tool design, fabrication and validation. Include fixtures, finishing tools and qualification work in both estimates.
Design changes Often implemented through a revised file and revalidated process. May require tool modification or replacement. Confirm whether the change affects orientation, supports, cure or inspection.
Per-part economics Material and workflow costs continue with every build. Unit cost may fall significantly after tooling is amortized. Compare accepted-part cost at the expected lifetime quantity.
Geometry and variants Can handle complex geometry and mixed variants, subject to support and cleaning access. Complexity may increase tool difficulty, but stable high-volume output can be efficient. Evaluate trapped resin, thin walls, support marks and dimensional access.
Production control Requires controlled files, resin, exposure, placement and post-processing. Requires a stable tool, machine setup and material process. Define records, revision control, sampling and release criteria for either route.

Printer Architecture

SLA, DLP and LCD/MSLA are not interchangeable labels

SLA

Stereolithography commonly uses a focused laser to trace each layer. Production suitability depends on the complete machine, optical system, resin, scan strategy, build volume and validated workflow—not the acronym alone.

DLP

Digital light processing projects a layer image through a digital optical system. The practical result depends on projection geometry, pixel mapping, exposure control, resin behavior and how the build is arranged.

LCD / MSLA

Mask-based systems use an LCD as an image mask over a light source. Screen specifications do not independently prove dimensional accuracy, repeatability or throughput; representative batch testing remains necessary.

Material and Design

The resin and the part geometry must be validated together

A resin datasheet is a starting point, not a guarantee for a specific part. Printed behavior can change with printer architecture, exposure, layer strategy, orientation, feature thickness, supports, washing, complete drying, UV post-curing and environmental conditions. Request the current technical datasheet, safety data sheet, handling instructions and the processing guidance for the exact material revision.

For production parts, translate broad requirements such as “strong,” “flexible,” “heat resistant” or “accurate” into measurable criteria. Examples include a load case, allowable deflection, fit with a mating component, surface zone, minimum wall, temperature window, chemical contact, inspection tool and sampling rate. Claims that cannot be tied to the intended application should not be used as release criteria.

Design checks before batch approval

  • Critical dimensions and tolerance zones are identified on the drawing.
  • Support-contact areas avoid important cosmetic or mating surfaces where possible.
  • Hollow sections include accessible drainage and washing paths.
  • Thin walls, holes and slots are tested at production orientation.
  • Part spacing and nesting represent the expected batch layout.
  • Post-cure fixtures or distortion controls are defined when needed.
  • Inspection can reach the features that determine acceptance.
  • The file revision and process profile are controlled before release.
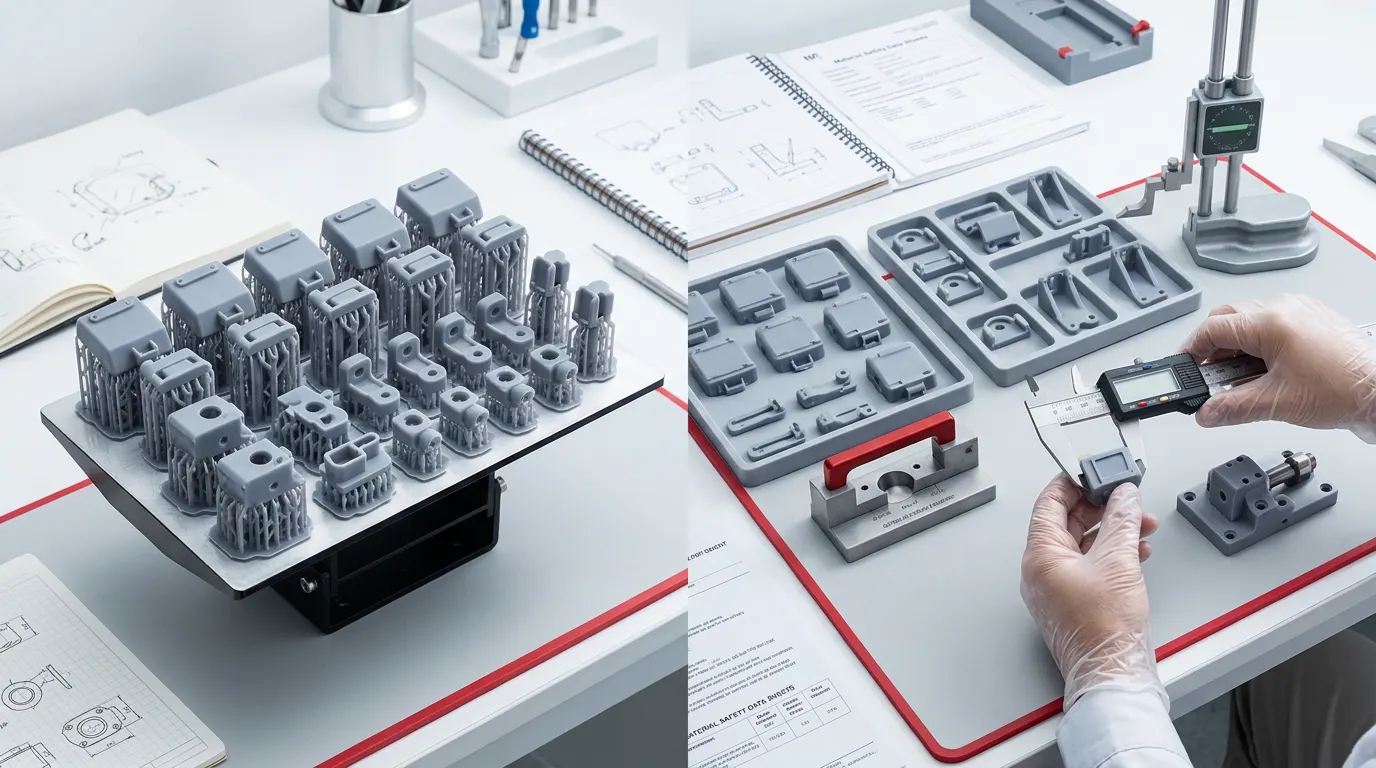
Nested resin parts on a build platform beside dimensional inspection tools
Batch density must be balanced against support access, cleaning, consistency and inspection—not maximized without qualification.

Production Control

How to move from a successful sample to repeatable low-volume output

A good sample proves that one part can be produced. It does not prove that the same outcome will repeat across a full platform, multiple resin lots, different operators or a month of production. The transition to manufacturing requires a controlled baseline.

  1. Freeze the approved inputs. Record the model revision, slicing software and profile, printer, resin grade and lot, orientation, supports, placement, wash method, drying condition and cure cycle.
  2. Define the process window. Identify which variables may change and what limits are allowed. Do not assume that a setting from another printer, resin or geometry is transferable.
  3. Qualify a representative batch. Use normal platform loading and include parts from different positions. Inspect the features that matter, not only overall appearance.
  4. Establish sampling and traceability. Decide what is checked on every part, every batch or at scheduled intervals. Keep enough records to investigate failures and revisions.
  5. Plan maintenance and consumables. Vat condition, build platform condition, optical cleanliness, resin handling and post-processing equipment can affect output. Include them in the production plan.

For regulated or safety-critical applications, additional qualification, documentation or certification may be required. Suitability must be established for the actual industry, jurisdiction, material and end use; a general-purpose resin printing workflow should not be treated as automatic compliance.

Common Errors

Mistakes that make a low-volume resin project look cheaper than it is

Comparing machine price instead of accepted-part cost

A lower equipment quotation can still produce a higher cost per accepted part if the workflow requires more failures, labor, supports, maintenance or rework. Compare the complete operating system and the production requirement.

Using a single showcase sample as production proof

A carefully oriented demonstration part does not represent a full platform of production parts. Pilot builds should use realistic nesting, repeated parts, normal post-processing and agreed inspection.

Assuming nominal resolution equals accuracy

Screen, projector or laser specifications describe only part of the imaging system. Actual dimensions also depend on calibration, optical behavior, resin response, geometry, orientation, supports, exposure and post-processing.

Ignoring washing, drying and curing capacity

As print capacity increases, post-processing may become the bottleneck. The number and size of parts that can be cleaned, fully dried, cured and inspected consistently can limit real output more than the nominal print cycle.

Locking the process before testing the difficult features

Validate deep cavities, thin walls, unsupported spans, holes, threads, mating surfaces and cosmetic zones early. Testing only the easiest geometry delays the most important production decision.

YIDIMU Application Review

Evaluate the printer, resin and post-processing workflow as one system

YIDIMU presents professional resin 3D printing categories for industrial, flexible-elastomer and dental workflows, together with photopolymer materials, UV curing equipment, application support and sample evaluation. For a low-volume project, begin with the part rather than a model name.

Review the industrial resin 3D printer range, available resin materials and post-processing equipment. The existing small-batch production application page shows the intended application direction, while the manufacturer evaluation guide provides a broader supplier-check framework.

For a project-specific discussion, share the model dimensions, geometry, intended quantity, material behavior, critical features, surface requirements and inspection criteria. Request current specifications and material documents for the exact system under consideration, then confirm the decision through representative sample testing.

Frequently Asked Questions

Resin 3D printing for low-volume manufacturing FAQ

How many parts count as low-volume manufacturing?

There is no fixed universal number. Low volume is the quantity range in which a qualified additive workflow remains more practical than committing to tooling. Compare lifetime quantity, revision frequency, accepted-part cost and required lead time.

Can resin 3D printed parts be used as end-use products?

They can be used for some end-use applications when the exact resin, geometry, process and post-processing have been validated against the real operating requirements. Do not infer suitability from a generic material label or a single sample.

Is LCD resin printing always faster for batch production?

No. Layer exposure method is only one factor. Total output depends on part height, layout, release motion, resin behavior, supports, failure rate and post-processing capacity. Compare a representative batch on the exact system.

What should be included in a low-volume resin printing quote?

Include the printer configuration, resin, supports, expected yield, labor, washing, drying, UV post-curing, maintenance, inspection, packaging, training and facility requirements. A machine-only quotation does not show accepted-part cost.

What files and information should be submitted for evaluation?

Provide the 3D model, overall dimensions, quantity, critical features, tolerance and surface requirements, intended environment, material expectations and inspection method. Photos or drawings of mating parts can also improve the review.

Application Evaluation

Test the difficult part before planning the production batch

Send YIDIMU your model, target quantity, critical dimensions, material expectations and post-processing requirements. The review can focus on equipment category, resin direction, build layout and whether a representative pilot batch is needed.

Discuss Your Application