Product Development Guide

Resin 3D Printing for Appearance Prototypes

Resin 3D printing is well suited to appearance prototypes when a team needs to review shape, proportion, fine details, surface transitions, interfaces, and presentation quality before committing to tooling. The printed part is only the starting point: orientation, support placement, washing, complete drying, UV post-curing, sanding, priming, painting, and inspection determine whether the model is useful for a real design decision.

  • Visual design review
  • Surface-quality planning
  • CMF evaluation
  • Sample validation
Industrial designer reviewing finished resin appearance prototypes beside a professional 3D printer

Define the Decision

What an Appearance Prototype Should Prove

An appearance prototype is a physical model used to judge how a product looks and feels before production. It may represent a complete housing, a control panel, a handle, a wearable shell, a packaging concept, a dashboard trim part, or a presentation model. Its value is not simply that it resembles the CAD file. It must make the intended design questions visible.

Before preparing the model, write down the review criteria. A design team may need to compare overall proportions, corner radii, transitions between surfaces, seam placement, button position, text legibility, grip comfort, visual balance, or the relationship between several assembled components. A customer-facing model may also need a controlled color, gloss level, texture, logo position, or transparent window.

Appearance questions

  • Does the silhouette communicate the intended product character?
  • Are edges, radii, openings, textures, and small features visually clear?
  • Do gaps, seams, buttons, labels, and interfaces look balanced at viewing distance?
  • Does the surface accept the required primer, paint, coating, or polishing process?

Questions that need separate validation

  • Will the final production material survive impact, heat, chemicals, or sunlight?
  • Will a snap fit, living hinge, seal, or threaded feature perform over repeated cycles?
  • Will a transparent part meet an optical transmission or distortion requirement?
  • Will production tooling reproduce the same texture, color, and dimensional behavior?

Process Fit

Why Resin 3D Printing Works for Visual Prototypes

Vat photopolymerization builds parts by selectively curing liquid photopolymer resin with light. Laser-based SLA, projected-image DLP, and LCD-masked printing use different exposure architectures, but all can support detailed prototype work when the printer, resin, geometry, orientation, settings, and post-processing are controlled.

For appearance work, the practical advantage is the ability to create fine features, smooth-looking curved surfaces, sharp text, thin visual separations, and complex housings without first making a dedicated mold. Multiple design versions can be printed, compared, modified, and reprinted while the product definition is still changing.

Resin printing is especially useful when the model includes small vents, embossed or recessed symbols, organic curvature, tight transitions, decorative features, or several parts that must be reviewed together. It can also produce master models for painting, coating, casting, or silicone molding. The final presentation quality, however, depends on how much finishing labor the prototype receives.

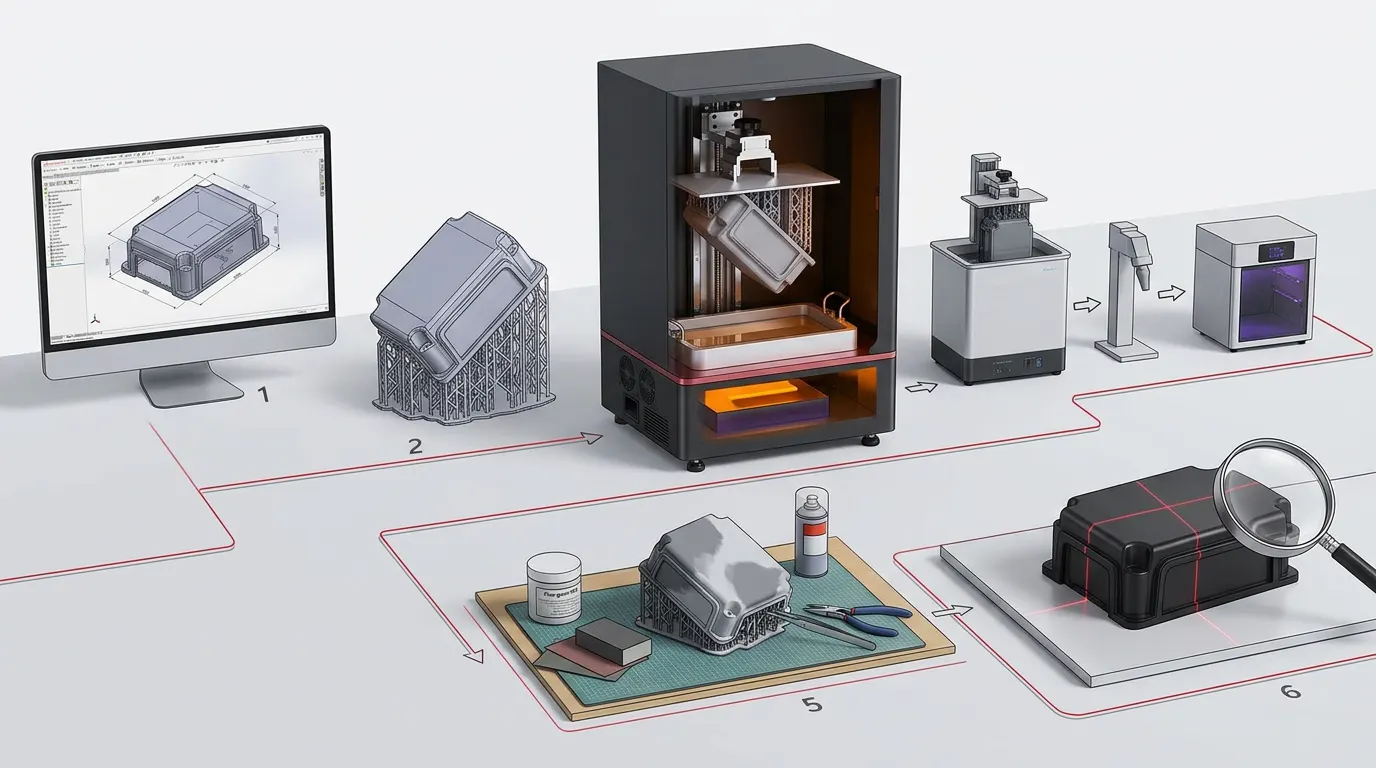
Workflow from CAD preparation and resin printing to sanding, priming, painting, and appearance inspection
A useful appearance prototype is a controlled workflow, not only a printed object.

Controlled Production

Resin 3D Printing Workflow for Appearance Prototypes

The workflow should protect the surfaces that matter most and make finishing predictable. Treat the visible “A-surfaces” differently from hidden, internal, or easily repaired areas.

Define the prototype objective

State who will review the model, what decision must be made, the expected viewing distance, whether the part will be handled, and which surfaces must look production-like. This determines the required resolution, material color, assembly method, and finishing level.

Prepare the CAD model for physical review

Confirm units, overall scale, wall thickness, small text, minimum gaps, edge breaks, and component separation. Large hollow parts may need internal support, drainage, and vent features. Split lines should be placed where they can be assembled and finished without damaging key surfaces.

Orient the part around visible surfaces

Orientation affects support locations, stair-stepping, drainage, peel forces, and the amount of finishing work. Keep supports away from critical cosmetic faces where possible. A longer print can be justified when it reduces marks on a surface that will be presented to customers or management.

Select resin for the review goal

A neutral gray or white material can reveal form and surface defects. A tougher material may be useful when the prototype will be assembled or repeatedly handled. Transparent or translucent concepts require additional planning because support scars, internal layer boundaries, trapped resin, and polishing quality remain visible.

Print with a documented process

Use a verified printer profile and record the resin batch, layer thickness, orientation, support strategy, exposure settings, and environmental conditions. Results depend on the complete system, including light uniformity, Z-axis movement, resin condition, vat film, platform preparation, and operator control.

Wash, dry, and post-cure correctly

Remove uncured surface resin using the process specified for the material. Allow the part to dry completely before inspection or coating, then complete UV post-curing according to the current resin documentation. Inconsistent washing or curing can affect tackiness, color, surface appearance, dimensions, and handling behavior.

Finish only as much as the decision requires

Remove supports carefully, then sand, fill, prime, paint, polish, or clear-coat according to the target finish. Preserve sharp edges and designed textures. Record the labor time, because a prototype that requires extensive hand finishing may be suitable for a presentation model but inefficient for repeated design iterations.

Surface Control

What Determines the Final Surface Quality

The nominal pixel size, laser spot, or layer thickness does not independently predict how a finished appearance model will look. The visible result is created by several linked decisions. Representative sample testing is more reliable than judging a machine from a single headline specification.

Factor How it affects appearance Practical control
Model orientation Changes layer visibility, support placement, drainage, and deformation risk. Protect the most visible surfaces and compare alternative orientations before slicing.
Support strategy Support tips can leave pits, raised marks, or local distortion. Move contacts to hidden faces, distribute loads, and remove supports with suitable tools.
Exposure and light uniformity Over- or under-exposure can soften features, change gaps, or create inconsistent surfaces. Use a validated profile and verify performance across representative build positions.
Resin formulation Influences color, opacity, surface response, sanding behavior, brittleness, and cure response. Choose by the prototype objective and confirm the current technical documentation.
Washing and drying Residual resin, solvent marks, or incomplete drying can create gloss variation and coating defects. Use controlled washing, clean fluid, complete drainage, and sufficient drying time.
UV post-curing Can change final color, dimensions, hardness, and surface behavior depending on the material. Follow material-specific time, temperature, and light requirements rather than a universal cycle.
Manual finishing Sanding and coating can hide layer and support marks but can also round edges or fill texture. Use staged abrasives, controlled primer thickness, masking, and inspection between steps.
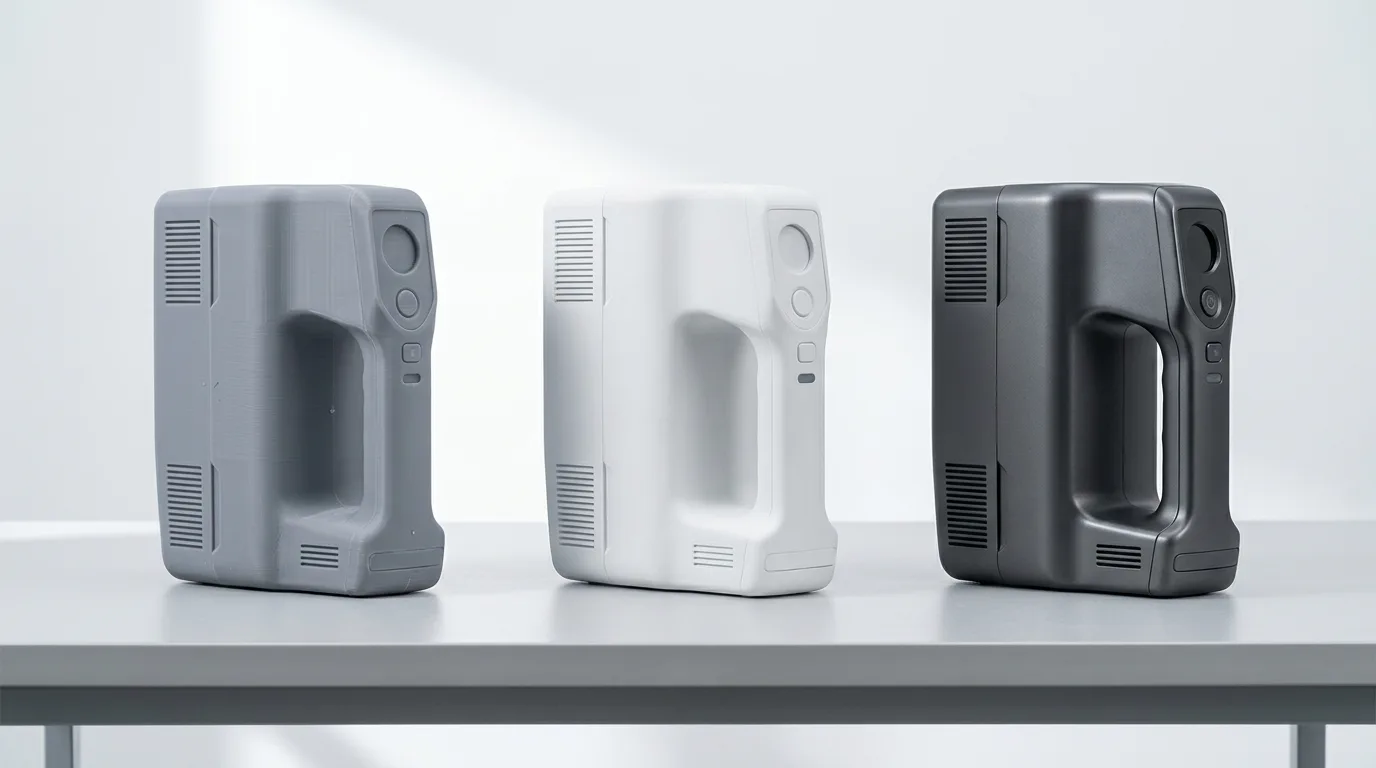
The same resin product housing shown as a raw print, sanded and primed model, and painted appearance prototype
Raw print quality and final presentation quality are related, but they are not the same deliverable.

Design Review

Appearance Prototype Inspection Checklist

Inspect the model under the lighting, viewing distance, and handling conditions expected during the design review. A glossy surface reveals waviness and sanding defects; a matte primer can reveal form more clearly; directional lighting can expose support scars and layer transitions that diffuse lighting hides.

  • Overall size, proportion, stance, and visual balance
  • Continuity of curved surfaces and edge transitions
  • Sharpness of text, icons, vents, and decorative details
  • Gap consistency between assembled covers and controls
  • Button location, reach, grip, and user interaction
  • Support marks, sanding flats, pits, and coating defects
  • Color, gloss, texture, masking lines, and finish consistency
  • Visibility of internal structures through clear or translucent areas
  • Differences between the prototype and intended production process
Engineer inspecting a finished resin appearance prototype under controlled studio lighting
Controlled lighting and documented inspection help distinguish design issues from printing and finishing defects.

System Selection

How to Evaluate a Resin Printer and Workflow

For appearance prototypes, equipment selection should begin with representative parts rather than a generic specification comparison. Use a sample that includes the surfaces, text, openings, thin edges, assembly features, and dimensions that matter in your real product.

Match build capacity to the usual prototype

A larger build volume can reduce splitting and assembly seams on housings and presentation models. It may also allow several design variants in one build. Confirm, however, that the washing, drying, curing, handling, and finishing equipment can accommodate the same part size.

Evaluate uniformity and repeatability

Print the same evaluation feature in different areas of the platform and compare detail, dimensions, and surface response. Repeat the build after normal cleaning and setup. This is more useful than relying on one successful demonstration part.

Review the material and finishing system together

The printer must support a resin that fits the visual and handling objective, and the workshop must be able to wash, fully dry, post-cure, sand, coat, and inspect it safely and consistently. Ask for current technical documentation, processing guidance, storage requirements, and compatibility confirmation.

Calculate labor as part of prototype cost

Appearance models often include support removal, bonding, filling, sanding, primer, paint, masking, polishing, and inspection. Compare workflows using the total qualified-model cost and turnaround time, not only resin consumption or exposure speed.

YIDIMU provides professional resin printing equipment, photopolymer materials, and post-processing support for product development and sample validation. You can review the industrial resin 3D printer range, compare available resin materials, explore industrial prototyping applications, or submit a representative model through the sample printing and technical consultation page. Final equipment, resin, settings, and process suitability should be confirmed against the current specification and a sample test.


Frequently Asked Questions

Resin Appearance Prototype FAQ

Is resin 3D printing suitable for customer presentation models?

Yes, when the geometry, orientation, support placement, resin, washing, curing, and finishing process are planned for the presentation standard. Customer-facing models commonly need sanding, primer, paint, coating, or polishing beyond the normal print workflow.

Can an appearance prototype also be used for fit and assembly checks?

It can support basic fit and assembly review, but the required tolerances and handling loads should be defined first. Resin behavior, support distortion, curing, coating thickness, and printer calibration can affect gaps and mating features. Critical interfaces should be measured and tested separately.

Which resin color is best for evaluating product form?

Neutral gray often makes surface transitions and defects easy to see, while white can support clean presentation and painting. The best choice depends on lighting, the intended finish, and whether the team is evaluating form, texture, color, or transparency.

How can support marks be reduced on visible surfaces?

Orient the model so contacts land on hidden or less important faces, use an appropriate support strategy, and remove supports carefully after the specified washing and curing sequence. Remaining marks may require controlled sanding, filling, and primer.

Can clear resin produce a fully transparent prototype?

Clear or translucent resins can support transparent-looking prototypes, but optical appearance depends on geometry, wall thickness, orientation, internal cleanliness, support removal, sanding, polishing, coating, and the material itself. A transparent display model should not be treated as proof of production optical performance.

What should be included in a sample-printing request?

Provide the 3D file, overall dimensions, quantity, critical surfaces, target color and finish, assembly requirements, review purpose, deadline, and any dimensional or handling criteria. Identify which faces may accept supports and which must remain cosmetic.

Validate Before Equipment Selection

Submit an Appearance Prototype for Process Evaluation

Share the model size, visible surfaces, required finish, material expectations, quantity, and review criteria. A representative sample can help evaluate orientation, support strategy, resin choice, post-processing effort, and the equipment capacity required for your workflow.